Discover our guestOne Service

Visitors book
GuestOne’s Visitors book lists all upcoming visitors and all necessary information (location, dates, companies,…). It is possible to add visitors, send invitations and QR codes or access codes to future visitors and manage check-in and check-out.
Creating a new visitor
Here is how to create one or more new guests in theVisitors book in guestOne. This will allow you to send invitations and QR codes or access codes to future visitors.
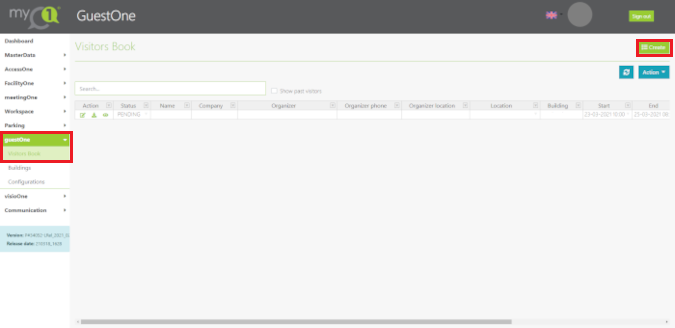
Go to the GuestOne tab, then Visitors Book.
You will arrive at this page.
 *The visible tabs depends on the rights you have been granted. If you wish to give specific access to
the reception staff, you have the possibility to view only a limited number of tabs.
limited number of tabs.
*The visible tabs depends on the rights you have been granted. If you wish to give specific access to
the reception staff, you have the possibility to view only a limited number of tabs.
limited number of tabs.
Every user of the system has the possibility to create visitors in the guestOne module for which he/she will be responsible.
In addition, guestOne administrators have the possibility to create visitors on behalf of another person. This allows receptionists, for example, to create visitors for a person in the building.
To create a visitor, click on  at the top right of the Visitors Book.
You will land on this page.
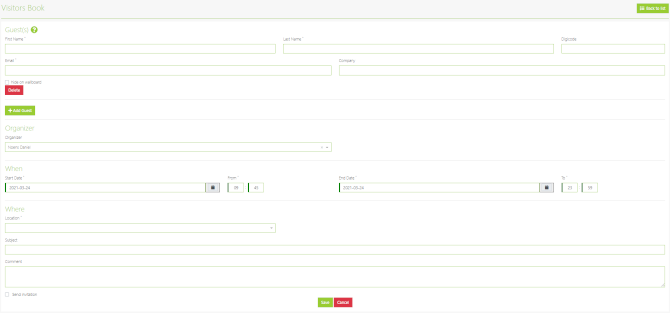
Guest(s)
The first part of the visitor creation screen is about the visitor. The following fields are mandatory:
- first and last name
- e-mail address
The company for which the visitor works and the visitor’s passcode are optional.
If the code is left blank, a code will be generated automatically and sent to the visitor. The possibility to choose it is given to allow the use of pre-printed badges or special accesses linked to pre-defined codes in the access control system.
Adding multiple visitors to the same invitation
It is possible to encode several people in one invitation. To do so, click on the  button below the Guest(s) category as many times as necessary. Each
click brings up a new set of fields for entering a new person.
button below the Guest(s) category as many times as necessary. Each
click brings up a new set of fields for entering a new person.
The following fields are for the invitation itself:
Organizer
The first drop-down menu allows you to select the host for this invitation. This will be the person
responsible for the visitor(s) when they are on site.
When a non-administrator user creates a visitor, this field is not editable for them. It is pre-populated
with their name.
When
This category allows you to configure the period of time during which the created access
will be active. Choose a start date and time and an end date and time.
Where
This field allows you to specify which zone you wish to give access to by this
invitation.
Why
This field is optional and allows you to specify a subject and comments for
this invitation. This subject and comments can be sent by email to visitors.
Send invitation
All that remains is to tick or not tick the “Send invitation” box.
If this box is ticked, an e-mail will be sent to each visitor whose e-mail address is given, containing information useful for
This e-mail will contain the information needed to access the site, as well as any comments added by the creator of the invitation.
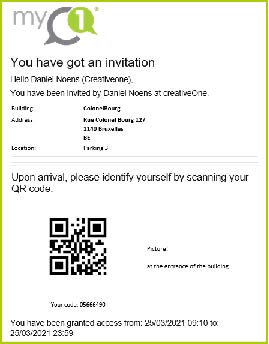
Here is an example of an invitation email.
Save
If all fields are filled in correctly, the  button will be active, and we can register
our new visitor who will therefore appear in the Visitors book table with the status PENDING.
button will be active, and we can register
our new visitor who will therefore appear in the Visitors book table with the status PENDING.
Visitor management
The management of visitors accessing the building(s) is essentially based on the status assigned to each visitor. each visitor. These statuses are either assigned automatically by the system or modified manually by a manually by a guestOne administrator.
Any guestOne user can check the status of their visitors at any time.
GuestOne administrators, including receptionists, can also adjust these statuses based on their interactions with the visitor.
They can also create a new visitor in the Visitors book, in case an unannounced person shows up.
Status column
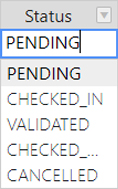
Pending
This status is assigned automatically when a visitor is created. It means that the visitor is expected, but there is no information about his position yet.
Checked in
This status is assigned automatically when a pre-encoded visitor identifies himself at a kiosk or other automatic device. Typically, he will receive this status by scanning his QR code.
Validated
This status reflects the fact that the visitor’s identity has been verified. Depending on the facility, it may be assigned automatically during a telephone validation or even automatically to all visitors receiving the status “CHECKED IN” if no further verification is required.
If a visit to a receptionist is required, the receptionist will usually assign this status after visual identification of the visitor.
Checked out
This status means that the visitor has left the premises. It can be assigned manually by the receptionist or automatically from the identification of the visitor on leaving (QR code…).
Editing visitors
You can edit the guest’s record or create different actions in the Action column below.
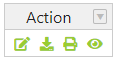
 Edit guest information
If a visitor needs to be modified in the system, either in terms of contact details or access (time, duration, location, subject…), simply click on the small pencil.
You are then free to modify this data, and as long as the new data is valid, the modified visitor can be registered.
When editing a visitor, the “Send invitation” box is never checked, even if it was checked initially. initially checked. Checking it again when editing the visitor will cause a new invitation email to be sent when the visitor is registered. invitation e-mail when registering the visitor.
 Download the badge
You can download the guest’s badge in PDF format using this button.
 Print the badge
his button prints the guest’s badge directly to the kiosk printer (if this option has been selected).
 View the guest
A view of the guest’s details is possible with this button.
The visitor’s path
There are 4 possible routes:
- Present yourself to the receptionist to register your arrival.
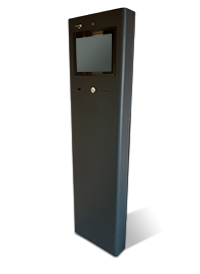
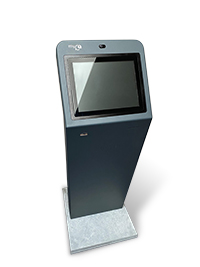
- Register on one of the terminals below (Totem, wall or curved).
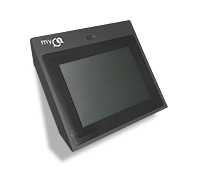
- Scan your QR code at one of the kiosks.
- Mixed regime: If the receptionist is absent, there may be a kiosk to register or scan his/her QR code to confirm his/her arrival.
 If the kiosk does not have a QR code reader or if it is difficult to read, the code can be entered manually by pressing the icon here on the left-hand side of the screen.
The guest is then invited to contact the host.
Fire attendance list
The GuestOne system provides access to the list of people in the building. If entries and exits are recorded, the arrival and departure times are shown. If only entries are recorded, the list of people who have entered during the day is shown.
Access rights
Each guestOne user has access to the same Visitors Book and Visitor Creation screens.
However, the user will be able to view only his own visitors, or more However, the user will be able to view only his own visitors, or more broadly all the visitors he administers according to his status. Here are the different statuses:
- simple user
- guestOne administrator for his company
- his building or his company group
In the same way, he can create visitors either for himself or for one of the persons belonging to the company he people belonging to the company he manages.
Questions?
Do not hesitate to contact our helpdesk if you need more information.
 support@creativeone.eu
 +32 10 23 39 60
+32 2 880 79 90
+32 10 23 39 60
+32 2 880 79 90